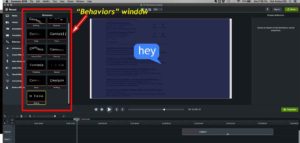
Camtasia Behaviors

One of the cool features of Camtasia are “behaviors”. 

Behaviors all you to manipulate objects in your videos.  Shifting, sliding & fading are just a few features you can incorporate into your videos. 

Say you have a video of a person discussing the latest in a health topic, say the keto diet.  The speaker is listing the types of food one might bring for their work lunch while on this diet.  The list could contain: 

Hard boiled eggs

Celery sticks

Small cubes of cheese

As the presenter lists these items you could have the text or the annotation of this list appear above the speaker’s right shoulder.  They could “just appear” or you could use behaviors to add a bit of pizazz to your video. One option could be use of the “Sliding” behavior to have each item slide into position (from the top, bottom, left or right – your choice) as the speaker lists them.

You can do the same with images.  I made a Halloween video for a client offering “Scary Savings” and the image was a full moon with a cartoonish witch flying overhead.   At the end of the video I used the “Fade” behavior to have their logo appear on the moon. Camtasia lets you set the opacity of the image so, set to about 50%,  their normally bright-white background logo looked pretty good against the golden moon. 

Behaviors can be set at the beginning (“in”) middle (“during”) and end (“out”) of your object.   Set the behavior of your image on “In” to “Fade” – the “During” to “Pulsate” and the “Out” to “Sliding” your image will fade in, then shake or pulsate until the end of the clip’s timeline then it will slide off the screen.   You’re limited only by your imagination.

The Behaviors offered are:

Drifting:  Drifting is pretty cool, you can set the direction – top/bottom/right/left.  A logo for example set to direction = bottom will have the logo flip up from a vertical position off screen to the horizontal position (assuming a horizontal logo) at the final position on the screen.  Depending on which direction you set the image will flip up from either top right, top left, bottom right or bottom left corner of the screen.

Explode:  My favorite.  Explode is typically used for the “Out” setting, when an object is leaving the screen.  Explode an image, such as a logo, it’ll flip and spin around until it fly off screen. Explode text and all the letters jumble and ‘explode” offscreen.   The opposite is “Implode” which is used for objects to enter the screen. 

Fade: as mentioned earlier, “fade” lets you fade images or text into the screen or fade out.   Not as exciting but I find I use fade quite often as it’s less distracting and if you have a more serious video it’s a nice behavior. 

Fly In:  (and Fly Out for objects leaving the screen) Just that – appear as a very large object on screen which shrinks or flies into position.

Jump & Fall: One of the more fun behaviors, Jump & Fall has 3 effects based on the phase.  When an object enters the screen or “In” the item bounces in, you can set direction. During the middle – or the “during” stage, you can set the object to “jump” which will have the text or the image make small jittery jumps and to exit, or “Out” the setting is “Drop” which has the object drop from the screen.  Text looks very cool dropping as you can set it to have the text drop randomly which looks like someone upended a box of Scrabble tiles.

Pop Up:  Two settings for Pop Up, the “In” and “Out” settings are “hinge” which is essentially that, an object will appear as if it’s attached by a hinge at the bottom or top.  “During” you have the “Pop Up” behavior which has your object basically swing back and forth as might a sign hanging on hinges fastened to the top of it with nothing at the bottom.

Pulsating:  Three settings “In” is Grow which has your text or image grow from a point on the screen (nice effect), “During” has the object wiggle or pulsate at a speed of your choosing and “Out” uses a very effective “Shrink” effect to make your object shrink and disappear. 

Reveal:  Reveal appears for all three stages, In, During & Out. As the name indicates Reveal reveals your image or text a little at a time. 

Shifting:  All three also set to Shifting which essentially drops your image or text from the top.

Sliding: I use this often.  Sliding allows you to have your object slide in from various places on the screen and slide out as well, “During” offers a fading behavior which has your object or text fade in and out while waiting to move to “Out”

With any of these behaviors you can set “In”, “During” or “Out” to “none” which would disable all behavior during that part of the timeline.

Behaviors are great and are a big part of what makes Camtasia one of my favorite video editors. 

Continue Reading Camtasia Behaviors

Introduction to Camtasia

Camtasia is a sophisticated video editing software package from Techsmith.  Camtasia is not the end-all, be-all product however it’s a highly useful for multiple applications.  This post will take you through the various components of Camtasia.  

OVERVIEW

The Camtasia Screen

The Preview Window

The Media Bin

The Tool Box

The Timeline

The Camtasia Tools

Less sophisticated and less complex than Adobe Premier, Camtasia is highly useful to create many types of videos a small business may require.

The main sections of the Camtasia screen are: 

  1. The preview window
  2. The media bin
  3. The tool box
  4. The timeline

The Preview window

The preview window is just that, the screen in which you can see your work.  You can crop your video or position text or objects in the preview window. The preview window is also the place where you can run through your video to get a sense of its flow or understand timing. 

The Media bin

The media bin is the repository for your digital assets. This is the section where you would upload (or drag over) an image such as a logo, a video clip or a music track.   The library is also part of the media bin. The library is a great feature, you can create separate libraries and name them by project or client possibly. This allows you to put your hands on a specific piece of content you may need in new videos such as a client’s logo for example.   

The Tool box

The tool box is the section of your Camtasia screen where Camtasia ‘tools’ are located.  Tools include quick links to the Annotations, Media, Libraries, Transitions, Behaviors buttons along with many others. 

Timeline

The core of Camtasia is the timeline

The Camtasia Timeline

The timeline is the section where all the components are manipulated to form the completed video.  Timeline is where video clips can be cut for time, annotations and shapes can be placed on top of video clips to add captions to a video.   The timeline is also where a user can incorporate some nice Camtasia features such as transitions, behaviors or effects. Music or a voiceover track can then be laid across the top of a timeline to incorporate sound. 

As stated above Camtasia is not as sophisticated as Premier but it’s beauty is in its simplicity. 

The Camtasia Tools

Camtasia comes with a set of powerful tools designed to help make high quality videos yet they are very simple to use. The tools include: 

Media & Library

Annotations

Transitions

Behaviors

Animations

Cursor Effects

Voice Narrations

Audio Effects

Visual Effects

Interactivity

Media & Library

As described above the media bin is the section where you can drag assets so they are easily available during the editing process.  The Library tool allows you to store assets for later use.

Annotations

The annotation tool gives you the ability to annotate your videos with shapes and text modules. 

Transitions 

Transitions provide subtle to dramatic transitions from one frame to another, Camtasia offers a gentle fade or more vibrant transitions such as checkerboard, blinds or the circle effect. 

Behaviors

The behavior tool is one of my favorites, this enables you to create dramatic entrances for certain objects – say text zooming in to a frame or exiting a frame.  

Animations

Camtasia allows you to animate parts of your screen, you can have the screen shrink, tilt or pan.  The Custom animation function allows you to insert custom movements such as text moving from horizontal to a vertical position to build a kinetic typography effect.

Cursor Effects 

Cursor effects are designed to help highlight your cursor on a screen.  A screencast video where you record a walkthrough of a website, a software demo or a description of a spreadsheet would all be use cases where cursor effects would improve your video.

Voice Narrations

Use your computer’s internal mic or attach a better quality USB mic and add your narration to your videos.  Adding a narration to a video timeline as a separate object lets you replace the narration with another speaker without upsetting the flow of the core video. 

Audio & Visual Effects

Need to ‘clean up’ your vocal track?  Audio effects provide basic filtering to help reduce background noise etc..  You can also change pitch, fade a track (music) in or out and add captions. The Visual effects tool offer the ability to remove a color (use this when you make a ‘green screen’ video, modify the color or tint and do some basic masking.

Interactivity

Interactivity sounds like a great feature, you can add a ‘hotspot’ meaning a button on your screen to click taking you to another page, etc.. and you can add a quiz to your video.  The challenge is that you or your audience has to play an interactive video in TechSmith’s Smart Player to use interactive functions. They are a great idea but currently don’t work in a player such as YouTube.

Once you complete your video you have multiple output options.  First you should save your file in Camtasia’s native .cmproj format.   You can edit files in this format in Camtasia. 

Other output options include, a local .mp4 file that you can load directly on a website or social media platform.  You can export your video directly to your YouTube channel with a single mouse click. Other options include sharing directly with your Screencast.com account,  TechSmith’s Video Review which lets you get feedback from other video production peers and you can share your video file directly to Google Drive.

All in all Camtasia is an excellent tool.  Does it offer an “After Effects” add on like Adobe Premiere?  No. Will it take months to learn? No. For your day to day, bread & butter type of videos that most companies are looking to publish, Camtasia is a fantastic product. 

Continue Reading Introduction to Camtasia